


[[{“value”:”
Thank you for reading this post, don't forget to follow and signup for notifications!
Adding a suppressor to your AR-15 fundamentally changes how the weapon operates. While most shooters understand that cans reduce noise and muzzle blast, few grasp the mechanical consequences happening inside their action. The reality is that threading a suppressor onto your muzzle doesn’t just make your rifle quieter. It transforms your entire gas system into something that often needs retuning.
Understanding Suppressor Back-Pressure
When you fire an unsuppressed modern sporting rifle, expanding gases follow the bullet down the barrel and exit freely into the atmosphere. Some of that gas bleeds through your gas port, cycles back through the gas tube, and drives your bolt carrier group rearward. Engineers design this system with specific timing and pressure curves in mind.
Attach a suppressor and everything changes. The can creates resistance at the muzzle, essentially capping the end of your barrel with a series of baffles that slow gas expansion. This restriction causes pressure to build throughout the entire barrel system, including at your gas port. More gas flows through that port with greater force, hammering your bolt carrier rearward faster and harder than the system was designed to handle.
The symptoms show up immediately. Your rifle becomes overgassed, cycling violently with increased recoil and muzzle rise. Ejection patterns get erratic, throwing brass forward or straight up instead of the normal 3 o’clock position. Carbon and fouling accumulate rapidly in your receiver and on your bolt. Perhaps most noticeably, gas starts venting back through your charging handle and ejection port, blowing directly into your face with each shot.
The Cascade of System Effects
That excess gas pressure doesn’t just make shooting unpleasant. It accelerates wear on every component in your operating system. Your extractor tears at case rims with excessive force. Your ejector receives violent impacts that can cause it to break or lose tension. Bolt lugs and barrel extensions experience increased battering. The buffer and buffer spring take a beating as the carrier group slams rearward with more energy than they were designed to absorb.
Timing issues often emerge as well. When your bolt unlocks and begins moving rearward too quickly, residual pressure remains in the chamber. Cases extract before pressure fully drops, leading to sticky extraction, torn case rims, or even case head separations in extreme scenarios. Your rifle might run, but it’s running wrong.
The charging handle situation deserves special attention. Gas flows backward through the gas key on your bolt carrier, but when the system is overgassed, excess pressure seeks any escape route. The gap between your charging handle and upper receiver becomes a relief valve, venting hot gas and carbon directly into your face. If you’ve ever wondered why suppressed shooting feels like getting sandblasted in the eyeballs, this is why.
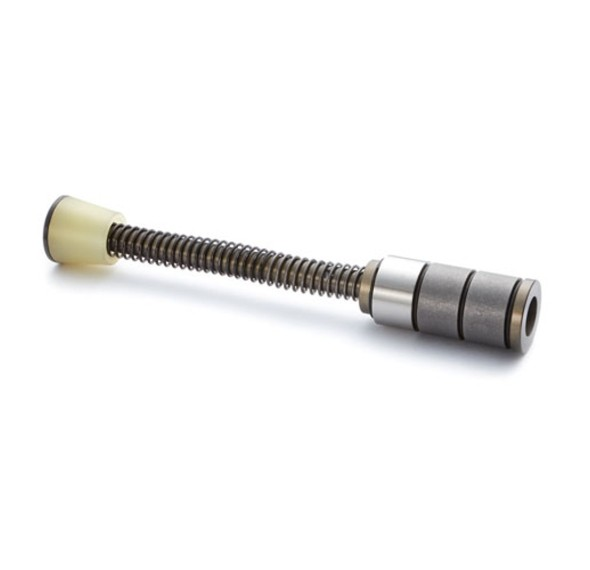
Buffer Weight Solutions
The simplest and often most effective solution involves increasing buffer mass. Standard carbine buffers weigh around 3 ounces, while H1, H2, and H3 variants progressively add tungsten weights to reach 3.8, 4.6, and 5.4 ounces, respectively. Some manufacturers offer even heavier options, pushing past 6 ounces.
Heavier buffers slow bolt carrier velocity through simple physics. More mass requires more energy to accelerate, which means that excess gas pressure gets absorbed in moving a heavier weight rather than slamming your BCG rearward at dangerous speeds. This dampens the violent cycling characteristics and brings ejection patterns back toward normal.
Start with an H2 buffer when adding a suppressor to a standard carbine-gassed AR. Test fire and observe your ejection pattern. Brass should land roughly at 4 o’clock, six to eight feet away. If it’s still flying forward or straight up, move to H3. Some heavily suppressed rifles with carbine-length gas systems need even more mass.
The trade-off often involves reliability with different types of ammunition. Heavier buffers work beautifully with full-power 5.56 NATO loads but might short-stroke with lighter .223 Remington or reduced-power ammunition. Test your chosen configuration with your actual ammunition across different temperature ranges before trusting it.
Adjustable Gas Blocks
If buffer weight alone doesn’t fully resolve your issues, or if you need to run varying types of ammunition, an adjustable gas block provides precise control over gas flow. These replace your standard block with a version featuring a set screw that restricts gas port size, and some AR-15 rifles come with them already included.
Installation requires removing your handguard and existing gas block, then timing and securing the new adjustable version. Start with the gas port fully open, then gradually close it in quarter-turn increments while test firing. You’re looking for the minimum gas flow that reliably locks the bolt back on an empty magazine with your chosen ammunition.
One of the biggest downsides of swapping out gas blocks is the level of technical skill required. While many people say that anyone can do it with simple tools, you should consider using a qualified gunsmith if you don’t have the proper tools or experience. Gas block installation requires careful attention to proper alignment, gas tube positioning, and secure mounting to prevent shifting during use.

Adjustable gas blocks gives you the ability to tune specifically for suppressed fire while still having enough adjustment range for unsuppressed shooting if needed. Some shooters maintain different settings marked on their block for suppressed versus unsuppressed use, though constant adjustment can be tedious.
Quality matters significantly with adjustable gas blocks. Cheap versions can vibrate loose, change settings under recoil, or fail to seal properly. Superlative Arms, JP Enterprises, Seekins Precision, and similar manufacturers produce reliable units that maintain their settings and withstand sustained fire.
Low Back Pressure Suppressors
Another option is to choose a suppressor that reduces back pressure. Unlike traditional suppressors, these specialized designs aim to minimize the amount of gas redirected back through the action. The fundamental principle involves specialized baffle designs, flow-through technology, or carefully engineered gas routing that allows more gas to exit forward rather than cycling back through the ejection port. Sometimes, low back pressure can also be achieved by simply using a larger caliber silencer than the cartridge you are shooting – a 7.62mm can on a 5.56mm rifle, for example.

Several manufacturers also offer “suppressor-optimized” gas ports on their barrels. Many people seem to get confused about this issue, but the simple truth is that a “suppressor optimized” gas port provides exactly the same function as a single setting on an adjustable gas block. These barrels feature smaller gas ports, designed to work optimally with suppressors attached; however, they may require careful ammunition selection when used without suppressors.
Gas-Buster Charging Handles
Even with proper gas system tuning, some back-pressure escapes through the charging handle channel. Standard mil-spec handles feature large gaps that vent gas freely. Upgraded charging handles with enhanced gas seals redirect this flow away from your face.
Radian Raptor SD, PRI Gas Buster, and Geissele SCH models incorporate various sealing approaches. Some use rubber o-rings, others employ tight-tolerance machining, and some combine multiple sealing features. The difference during suppressed fire is dramatic—no more gas in your eyes, reduced carbon in your face, and generally more pleasant shooting.
These handles work best with proper buffer and gas system tuning. You can’t seal away problems caused by fundamental overgassing, but once you’ve optimized gas flow, an enhanced charging handle eliminates the remaining blow-back issues.
System Integration and Testing
Proper suppressor tuning typically requires considering all these elements together. I like to start with using a low back pressure suppressor. Next, use buffer weight adjustment as your primary tuning solution. Add an adjustable gas block if buffer weight alone proves insufficient or if you need ammunition flexibility. Last, install a gas-buster charging handle to address residual blow-back after the system is properly tuned.
Test thoroughly with your actual suppressor and ammunition. Ejection patterns tell the story—cases landing at 3-4 o’clock indicate proper tuning, while forward or straight-up ejection means you’re still overgassed. The bolt should lock back consistently on empty magazines, and the rifle should feel controllable with manageable recoil.
Your suppressed rifle can run as smoothly as any unsuppressed gun once you understand and address the gas system dynamics. The key lies in recognizing that adding a can isn’t a simple accessory swap. It’s a fundamental modification that requires systematic tuning to maintain proper function.
“}]]
