


[[{“value”:”
Thank you for reading this post, don't forget to follow and signup for notifications!
This post was originally published on this site.
A shotgun is one of the oldest firearm designs still in regular use, and for good reason. Put simply, a shotgun is brutally effective at close ranges where most home defense scenarios occur. Still, owning a defensive shotgun for the house is not the same as being ready to use it safely and effectively. Training is the foundation, but equipment matters a great deal too. Thoughtful, simple gear choices make the gun easier to use under stress. Too many accessories, or the wrong ones, create problems you will fight with when you need the tool to work.
A Proven Platform — The Defensive Shotgun
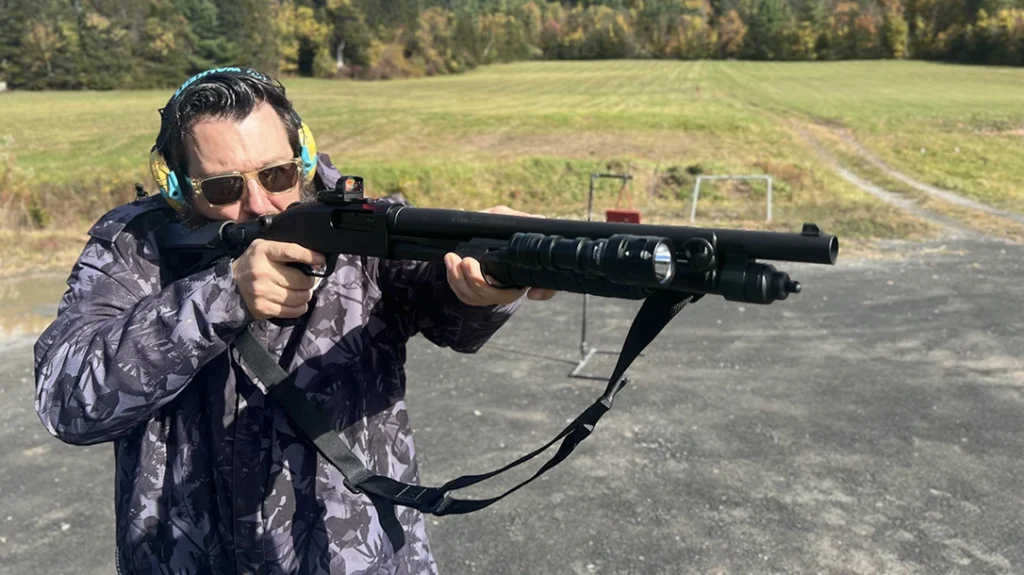
Build from a reliable base. For this setup I began with a Mossberg 590, the seven-shot tube version. The 590 is a defensive classic for a reason: rugged, familiar controls, and a long history of proven performance. When you choose your platform, think reliability first. Accessories come later and they should only be added if they solve a real problem for your mission.
Advertisement — Continue Reading Below
Sling & Ergo
A sling is mandatory. It keeps the gun on your person, frees your hands without setting the shotgun down, and creates a degree of control so unauthorized users cannot easily grab it. For this build I used a Magpul sling and QD studs mounted to a FAB Defense stock. The Magpul sling is simple, robust, and fast to manipulate. Quick detach mounting gives you options without locking you into a single configuration, the QD studs also allow you to exit the sling from either end.
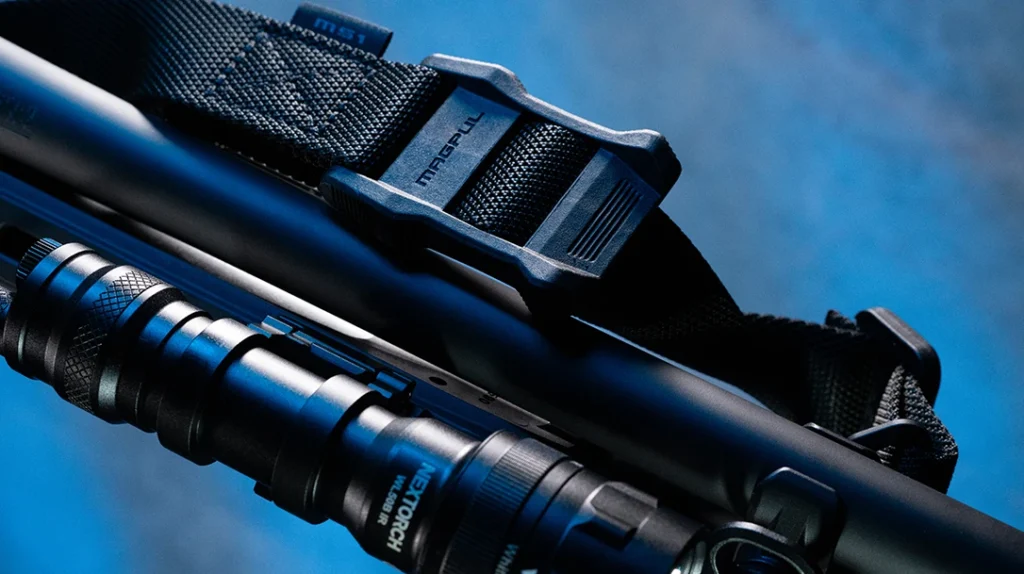
Ergonomics are about feel, texture, and repeatability. Fab Defense’s handguard in this setup offers plenty of M-LOK real estate for accessories, with added texture that helps when conditions are wet or when adrenaline has taken your fine motor skills. The rear stock in this case includes a shock buffer system. It looks like a standard buffer tube on the outside, but inside there is a spring and shock mechanism that soaks up recoil. I was skeptical when I first saw it, but after running hot defensive loads it genuinely soaks up felt recoil and reduces shooter fatigue. That means you can practice longer, cycle faster between shots, and remain more accurate when using stout loads.
Advertisement — Continue Reading Below
Sights
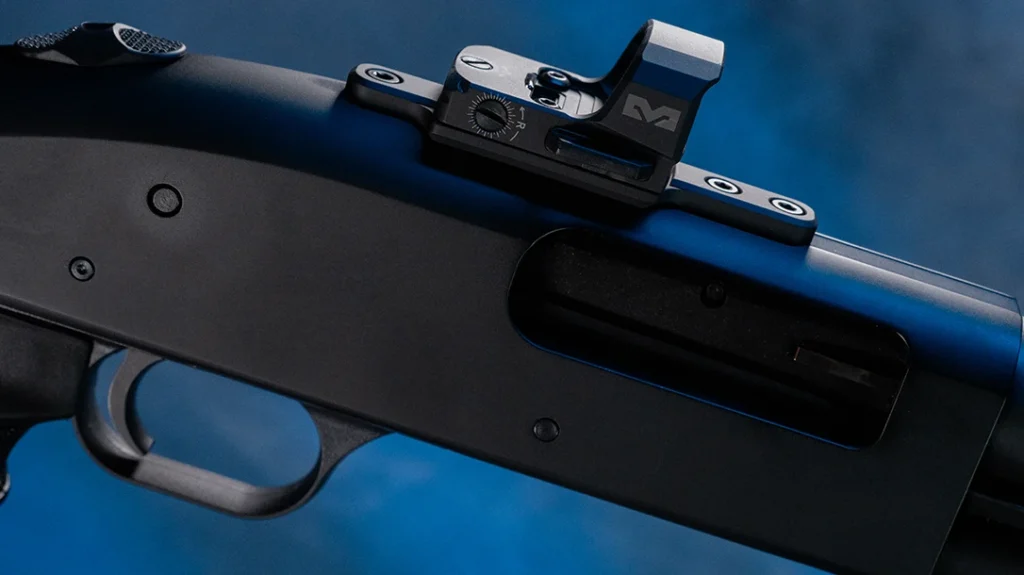
Sighting choices should favor fast target acquisition and redundancy. On the 590 I mounted a Meprolight MPO DF. It is an RMR footprint red dot running on a CR1623 battery with a stated runtime of 15,000 hours. The DF’s purpose-built baseplate allowed an almost co-witness setup with the front bead, giving an optical fast-aiming solution while keeping a visible backup.
Advertisement — Continue Reading Below
I also installed an XS Sights front bead night sight replacement. The XS front bead is a sensible backup because it is visible in extremely low light and costs far less than an optic. If your dot ever fails, the big white bead gives you a clear, quick index point and works well with a light.
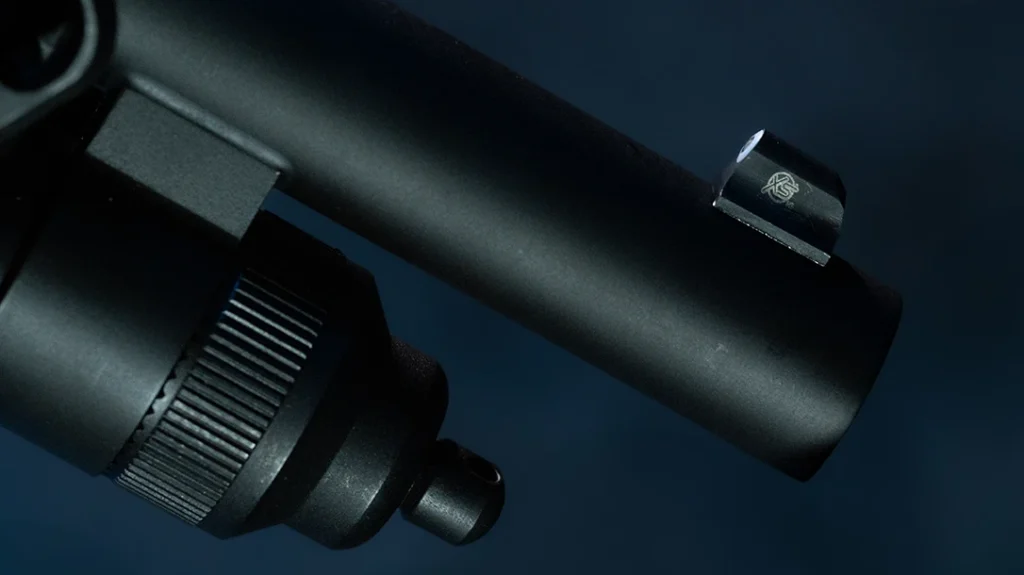
An optic plus bead is the pairing I prefer. The optic gives instant aiming in dim conditions, and the bead is a zero-tech fallback. Practice both ways so you can transition fluidly if one solution fails.
Advertisement — Continue Reading Below
More Than Lumens
A light is not optional. You cannot index a threat you cannot see. If you don’t have one on the gun itself you need to have some ambient light in your house and on the property itself. Out front, this 590 uses a Nextorch WL50B IR head unit with a momentary switch. Nextorch is known for building reliable weapon lights. The WL50B operates on CR123A cells or its rechargeable proprietary battery and capable lumen output is listed at 1000 lumens on high. It also produces IR output in its configuration, which may be useful in some setups and unnecessary in others. If you do not intend to use IR, select the white-light only option to avoid complexity.
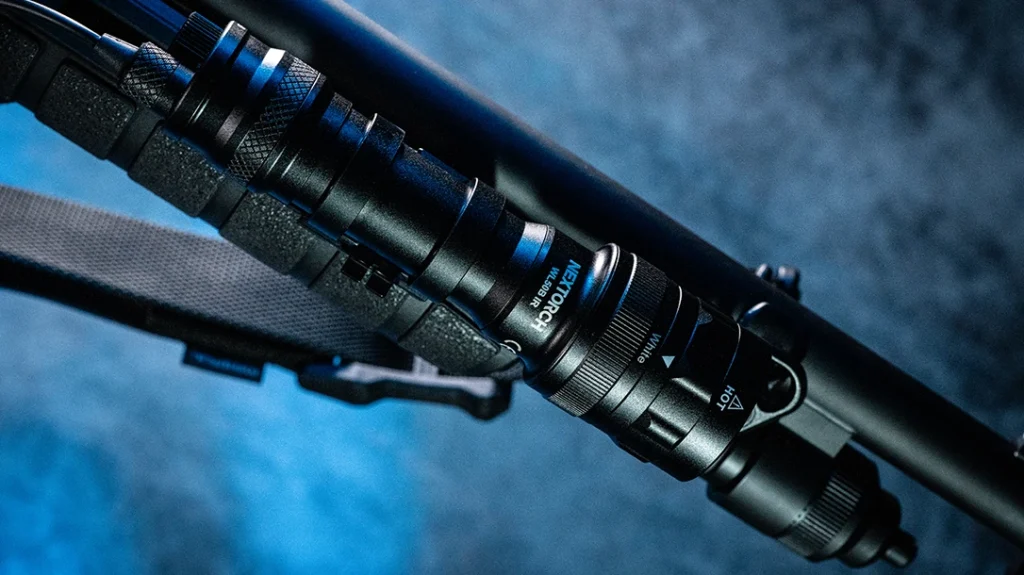
Important detail: mounting and switching matter as much as raw lumen numbers. If your light’s switch is awkward, you will not be able to manipulate it under stress. Likewise, a light that moves around under recoil will fail you. Test the placement, and if necessary reposition the switch and secure the mount with thread locker where appropriate. This gun needed just that. I built what I thought would work, it sucked and needed to be moved.
Advertisement — Continue Reading Below
Ammunition: Pattern & Distance
Ammunition selection is one of the most consequential decisions you will make. People often say, “get good ammo,” and that is true, but you need to define what “good” means for your house. The practical way to select a defensive load is to measure the maximum line-of-sight distance inside your home from the likely breach points to the positions where you expect the threat to present. That means walking the perimeter, imagining an intruder’s possible path, and using the farthest reasonable engagement distance as your test.
Buy three different loads and pattern them at that distance. Pattern testing shows you how the shot distributes and whether it is likely to keep the pellets inside the intended target. Shotguns remain ballistically powerful at home defense ranges, so you want the pellets to do their job on-target and not continue past where they can cause unintended harm.
In this build I tested Remington 00 Buck, which the data in this example reported as a nine-pellet packet at 1325 fps. Treat manufacturer and test data critically and test it on your own. I also tested Remington Rifled Slugger slugs through this 590. The gun is not fitted with a choke and is intended to run buck and ball. A rifled slug placed carefully from a smoothbore barrel shot a 1oz slug that averaged 1,416.1 fps over five shots in my testing. The Slugger easily hit a 9 in steel plate out to 50 yards, which demonstrates why slugs have utility when you need reach. Conversely, light birdshot like Nitro 27 is not ideal for defensive work; it has minimal recoil and cycles actions nicely for testing, but its wound potential and penetration patterns are designed for sport, not stopping threats.
Advertisement — Continue Reading Below

The rule of thumb is this: choose a load you can place where you want it and that patterns acceptably at the distances you might actually need it. Only load that trusted defensive round in your defensive gun when it is actively being used for protection.
Recoil Management
Recoil is not only about shooter comfort. It affects follow-up shots, endurance during extended training, and the shooter’s willingness to use the gun. The Fab Defense shock-buffer stock in this build materially reduced felt recoil and allowed me to run heavier defensive loads without significant fatigue. That makes it possible to train with real loads more often and to maintain consistent performance.
Reliability is non-negotiable. Any accessory you add increases the chance of failure if it is not compatible or properly secured. In my build I had to reposition the light and its switch after an initial test, and I used Loctite on key fasteners where movement could have created failures. Run the gun hard, clear it, shoot a number of full-magazine strings, then re-check fasteners and mounts.
The Elephant
Shotguns are “always empty” their power factor is high and capacity is low compared to handguns. There is no one right way to solve that problem; there are several perfectly valid approaches and a lot of personal preference and tradeoffs. Some shooters like a stock- or receiver-mounted caddy that holds a handful of extra shells in easy reach. Others prefer a side-saddle or Velcro shotgun cards that carry a tube-full of shells along the receiver for fast reloads.
What matters more than which method you choose is that the extra ammo is on the gun itself.Whatever system you adopt, practice reloading with it until the motion is second nature under time pressure.
Pitfalls & Simple Rules
There are three simple rules that will keep your setup usable. First, keep it simple. If an accessory makes the gun harder to manipulate, remove it. Second, test everything. If you do not test the entire system… gun, mounts, sights, light, sling, and ammunition; assume something will fail when you need it. Third, train with exactly what you will use for defense. That means the same sling, stock, magazine pattern, light, switch placement, and loads.
Gimmicks sell well on review videos, but many fail under recoil or in a damp, chaotic environment. Smart buyers pick proven components, mount them correctly, and then practice until the system and the shooter behave as one.
Final Thoughts
A defensive shotgun is a high-power factor, low-capacity firearm. That reality frames everything that follows. You will spend more time managing the tube than you will firing rounds, so think about how you will carry extra ammo and how fast you can get it into the gun when needed. I didn’t give you a recommendation here, not because it’s unimportant but you have to commit to it yourself.
A defensive shotgun is an honest tool: simple in concept, but precise in execution. Choose a reliable chassis, prioritize controls you can operate without fine motor skills, fit a dependable optic and a simple backup, mount a usable light, and pick and pattern your defensive load at real world distances found in your house. Add a sling and a practical method to carry spare rounds so the low capacity of the platform does not become a liability.
Above all, test and train. A well-built shotgun that has not been run, refined, and rehearsed will betray you when you need it. Build thoughtfully, practice deliberately, and keep the gear earned from experience, not impulse.
WHY OUR ARTICLES/REVIEWS DO NOT HAVE AFFILIATE LINKS
Affiliate links create a financial incentive for writers to promote certain products, which can lead to biased recommendations. This blurs the line between genuine advice and marketing, reducing trust in the content.
The post How To Setup A Defensive Shotgun appeared first on Athlon Outdoors Exclusive Firearm Updates, Reviews & News.
“}]]
